In Minecraft, there are many approaches a player can take to mining. This article explains several common techniques.
Cave Mining
Also known as Spelunking and Cherry-Picking, cave mining is simply the practice of exploring caves and extracting the ores found there. Ore veins are often found exposed along the walls, floors and ceilings of caves; this is especially true after update 1.2, when the incidence of ores in and near caves was increased (see Version History). Exploring a large cave system almost always results in finding large quantities of ore. Cave mining has a high return on investment, yielding more ore per time spent and requiring fewer tools (less pickaxe and shovel durability is lost mining stone, dirt and gravel) than other approaches.
On the other hand, cave mining is highly dangerous. Unexplored caves are dark and tend to contain many mobs; a sword, a bow and armor are practical necessities. The player should carry a large supply of torches to light up the cave and prevent extra mob spawns. Large cave systems can become confusing and special attention must be paid to navigation lest one quickly get lost. Moving through a cave too quickly makes it easy to miss unlit passages above or beside you, and carries the danger of stepping into an open shaft or falling into a lava pool. Portions of caves at level 10 and below are generally filled with lava. Because of these factors, players usually explore and light a cave first, then extract ores on the way back out, increasing the total time required and cutting down on mining efficiency.
The Cavern article contains tips on navigating large cave systems.
It is a good idea to carry a bucket of water. Caves often contain random lava flows, and cave areas below level 11 are filled with large lava pools. A bucket of water serves as both a fire extinguisher, if you fall in; and as a way to form obsidian surfaces over lava pools (pour water onto a stone block adjacent to a lava pool; do not stand between that spot and the lava).
Drifting
Caves often contain many dead-end passages and shafts. Many of these dead ends are actually thin barriers that, if removed, reveal continuing passages, sometimes into entire adjacent cave systems. Drifting is simply searching for adjacent caves by digging beyond apparent dead ends. Note that this increases the risk of getting lost. However you can help to orient yourself by placing your torches in a consistent manner. Such as only on the right hand wall or floor while going deeper. In this way you can walk with the torches to your left when you wish to leave.
Drifting can be effective in finding dungeons if there are mob sounds audible at a dead end.
Shaft Mining
Also known as Vertical Mining and Shafting
Safety
For all the discussion below, the number one rule of safety in Minecraft should be kept firmly in mind:
Never remove the block you are standing on if you don't already know what's beneath it.
Digging straight down can reveal an open shaft, a lava pool or both. Dying from falling damage at the bottom of a deep shaft can result in your belongings being too far from your spawn point to retrieve them in time. Falling into lava will destroy them outright. Therefore, mining 1x1 shafts (digging straight down) is something experienced players never do.
It is advised to carry a water bucket and/or some blocks of material somewhere in a quick-slot. A block can be used to quickly plug the leakage in cases of water or lava inflow from a side of a shaft, and water can be poured over flowing lava to turn it into cobblestone or obsidian, as well as to put out fire.
Never dig directly upwards, because you may unexpectedly trigger falling sand, gravel, or, if you're really unlucky, lava or a hostile mob. Standing to one side while mining blocks from the ceiling helps you avoid falling blocks and gives you a chance to react to a sudden lava outpour. If you do want to mine directly upwards, make sure to place ladders on the inside of the shaft, rather than placing blocks below you. The ladders prevent gravel or sand from falling on you and stop potential lava flows from killing you and wiping out your entire inventory. They also provide a quicker escape if you happen upon some mobs (by hitting a cave or a dungeon).
Methods
Staircases
Staircase mining is a common mining technique for quickly reaching lower levels of the map while continuing to gather Stone. It essentially consists of mining downwards in such a way that the player can always climb back up to the mine entrance. This has the advantage of not requiring ladders or other means of getting back to the surface.
Straight
The most basic strategy is to mine in a straight line at a 45° angle downwards, moving one block across for every block down. for added efficiency while climbing back up, dig out four blocks above each step instead of three. this way, you wont hit your head with each jump. To climb back up these stairs afterwards, you only need to hold down the jump key while moving forward.
After enough cobblestone (or wood) is collected, you can craft Stairs and place them at your downright tunnel. It will make the trip a lot smoother, easier and faster without any need to jump. Although an extra block from the ceiling of the staircase will need to be removed to accommodate the stairs.
Alternatively, you can dig diagonally. face a corner, and imagine that the corner block is the missing block of a 2x2x2 cube. Now dig that cube. Repeat, adding torches at every step. This mines more resources while also providing the diagonal directions, as opposed to the cardinal directions.
Spiral
Spiral staircases are slightly more complicated since they have frequent turns, but have the advantage of leading straight down. They also have the benefit of being more contained and give you a more targeted dig. One design is a 3x3 horizontal grid. By digging one block down at a time, and moving around the perimeter of your 3x3 area, you will have enough head room as you move down the staircase. You can optionally leave the central column for a barrier or remove it to place ladders centrally, but it isn't necessary for the functionality of the staircase. You can also add stair blocks to this setup as well.
Spiral (2x2)
- Stand on the bottom-left block of your staircase. Dig one block down, so you have to hop to exit the stairs.
- Mine the block/s in front of you and the block beneath. Drop down.
- Turn 90 degrees. Periodically place torch above head when dark.
- Repeat steps 2 and 3 until desired result achieved.
Shaft mining
Shafts are mined vertical tunnels used to gain access to underground mining sites. They can be of any widths starting from 1x1 blocks. Shafts with widths of 2x2 and up are able to be turned into water elevators for fast vertical transportation.
1x2
- Pick a place where you want your shaft
- Mine a first block adjacent to the block you are standing at
- Step down
- Mine a block you were standing at and one below it
- Place a ladder every block (from the 1.5 update, you cannot go up ladders with gaps)
- Go to 2.1
- Continue in above pattern until you reach desired depth. From then on use a horizontal mining method of your choice
3-in explosions
3-in explosion mining is the preferred method of using TNT to mine. You find a solid stone wall, mine 3 blocks inward, and then you place 1 block of TNT on the 3rd hollowed out space. Once placed, with stone in hand, you hit it with the stone block and and back up a few steps and block off the front of the hole with the lit TNT with 1 block of stone. The explosion should create a perfect 4x3x3 hole. Repeat as desired.
A much faster (but risky) technique is mining in a small alcove, filling it with multiple units of TNT, and igniting it, creating a fairly large cavern.While this variation uncovers a large number of blocks at once, the explosions destroy most of the blocks, potentially including valuable ores, and the explosion can let a large amount of lava to leak in, making the cave hard to access and burning any blocks spared by the explosion.
Supermine
A supermine is a combination of shaft and box mining. First, you use the shaft technique to go to desired depth is reached. Make a 3x2 or 3x3 room and place a torch in the center. Then, choose a direction and mine 5 spaces. Make another room and place a torch in the center. Finally, tear down wall in between the first and second room. Repeat until you have a massive cavern.
Shaft with water drop
With a separate descent shaft, getting to the bottom can be extremely fast; you simply fall into a water pit. Ascent is accomplished with a ladder. This arrangement can be accomplished by first stockpiling about 64 ladders along with 2 water-filled buckets, and then excavating a 3-block wide shaft. One side of the shaft becomes the water pit, while ladders are placed in the other side. The middle is then filled in to prevent falling outside the water pit while descending.
For detailed building instructions, see Vertical Mine Shaft With Water Drop.
Horizontal Mining (or Resource Mining/Stratifying)
Safety
Horizontal mining is not as dangerous as vertical. But there are some similar suggestions. Carry a water bucket and some blocks of some disposable, NON FLAMMABLE material (ex: sand, gravel, cobblestone) somewhere in a quick-slot. A block can be used to quickly plug the leakage in cases of lava, and water can be poured over flowing lava to turn it into a cobblestone, as well as to put out fire.
Methods
Branch Mining
An effective technique if you want to find rare resources with minimal effort. It is basically mining down to any level, usually to bedrock, and then mining outwards to the sides, much like a tree with a trunk and branches.
- Use the staircase method to dig down to bedrock.
- Go up 2 blocks and fill any space below you mined out.
- Dig a 3x3 room.
- Dig a straight 2x1 tunnel in a straight line then dig out 20 blocks every 4th block.
- To further increase efficiency, you can end the 20-block tunnel by digging 4 blocks of an 1x1 tunnels as each of the mined block reveals more than a 2x1 tunnel.
This method is based on the relatively low probability of desirable blocks being created without any neighbors, so it will occasionally miss small/narrow ore deposits that fall entirely between the branches, but it covers ground faster, so you'll usually get more ore for your time. If you'd rather be sure of 100% coverage, see the Strip Mining section below.
Diagram:
                           X = Tunnel "Trunk"
                           B = Branch
                           S = Staircase


          B       B                 B       B
          B       B                 B       B
          B       B                 B       B
          B       B                 B       B
          B       B                 B       B
          B       B                 B       B
          B       B       XXX       B       B
X X X X X X X X X X X X X XXX X X X X X X X X X X X X
          B       B       XXX       B       B
          B       B        S        B       B
          B       B        S        B       B
          B       B        S        B       B
          B       B        S        B       B
          B       B        S        B       B


Each branch can be any length, but about 20 blocks long is a good length to begin with.
Strip Mining
A similar system to those mentioned
Strip Mining is an efficient way to discover resources as it uncovers every block down a certain length of tunnel. It involves digging tunnels (usually 20 spaces long) either side of a two-block thick wall.
- Dig a room that is 7 blocks long, 10 blocks wide and 3 blocks high. Have your stairway/ladder in the middle of one of the 10 block walls, preferably 2 spaces wide.
- Starting in one of the corners, dig parallel to one of the walls of the room you just dug, for 20 spaces, placing a torch every 5 blocks.
- Then, dig another 20 block tunnel that has two blocks between it and the previous tunnel.
- Continue until you reach the other side of the room.
Diagram:
Key: A = Air
     B = Stone block
     S = Staircase
     T = Tunnel

                 A A A A A A A A A A T T T T T
                 A A A A A A A A A A B B B B B
                 A A A A A A A A A A B B B B B
                 A A A A A A A A A A T T T T T
                 A A A A A A A A A A B B B B B
                 A A A A A A A A A A B B B B B
                 A A A A A A A A A A T T T T T
                 T B B T S S T B B T
                 T B B T S S T B B T
                 T B B T S S T B B T
                 T B B T S S T B B T
                 T B B T S S T B B T
By utilising Strip Mining properly you can uncover all the blocks in quite a large area, and the mineral yields are quite high. Having the stairs 2 blocks wide allows for most efficient strip mining as they can be strip mined around. Also, a good length for each tunnel is 20 blocks long.
Advanced Strip Mining
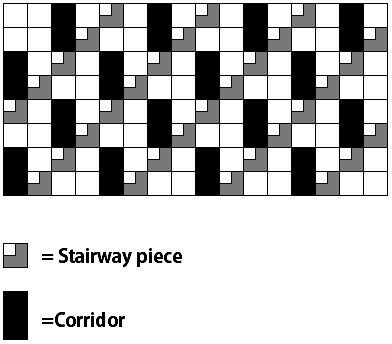
Advanced strip mining is one of the most efficient way to mine 100% of the ores on multiple levels.
By careful placement of corridors, more efficient mining becomes possible. The advanced strip mining lay-out is one such attempt at maximising the amount of visible blocks per block mined.(and in fact the best possible for horizontal corridors) The picture at the right is a side view of this simple tactic.
In most cases, the staircases would not be placed in the same z dimension, as that is inefficient when constructing through caves. Instead place the stairs slightly apart from one another. ladders will also allow convenient access, making it a matter of personal choice of what should be used.
To most efficiently use Advanced Strip mining, proceed down a branch until you have used up half of your picks, or your inventory is half full. Then, mine your way to another branch and head backwards.
Quarry Mining
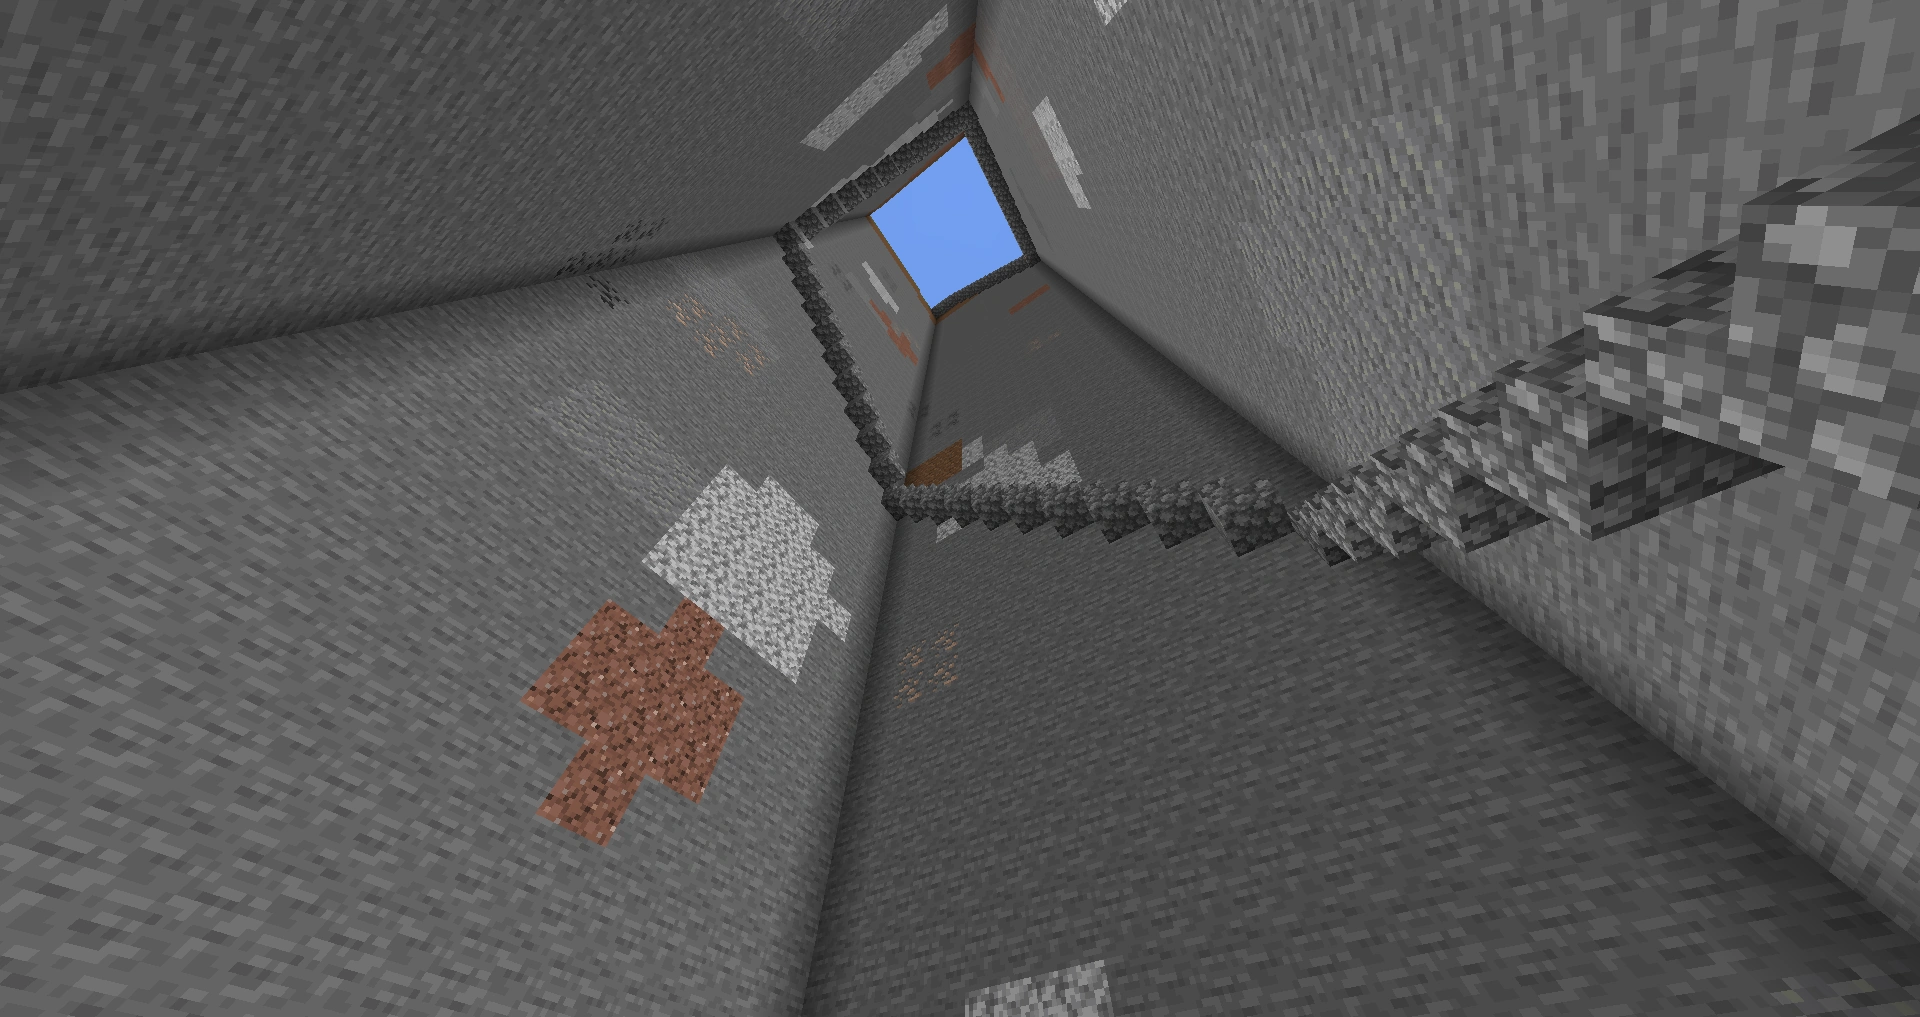
Looking up from the bottom of a Quarry Mine
Quarry Mining is very similar to strip mining, sharing the prospect of taking all resources within an area. The difference between Quarrying and Strip Mining is that the process of Quarrying involves a large rectangular or square strip, continually mined downwards with a staircase running along the side. This method got its name by its similarity to real world quarry sites. Quarries are typically ceased when a large cave is discovered (This does not directly stop the excavation, it just makes it difficult to continue), the miner abandons the Quarry for another project, or the "end of the world" is reached.
An unfinished 20x20 Quarry
The Construction of a Quarry is as follows:
1: Determine the size of the project, there is no standard so simply choose how big you want it to be, however it is advised that the area is large, to maximize resources within a single quarry. (A typical quarry can be 20x20 or 20x30, for example)
2: Begin Mining until the entire area is one block deep, save for one block which will become the stairs
3: Continue mining one block deep while keeping an extra block to extend the stairway, until the mine reaches bedrock or until you wish to abandon the project.
Example:
Key: - = Air
     B = Stone block
     S = Staircase
Top of mine:
         BBBBBBBBBBBBBBBBBBBBBBBBBBBBBBB
         BS----------------------------B
         B-----------------------------B
         B-----------------------------B
         B-----------------------------B
         B-----------------------------B
         B-----------------------------B
         B-----------------------------B
         B-----------------------------B
         B-----------------------------B
         B-----------------------------B
         B-----------------------------B
         BBBBBBBBBBBBBBBBBBBBBBBBBBBBBBB
Next few levels down:
         BBBBBBBBBBBBBBBBBBBBBBBBBBBBBBB
         B-----------------------------B
         BS----------------------------B
         B-----------------------------B
         B-----------------------------B
         B-----------------------------B
         B-----------------------------B
         B-----------------------------B
         B-----------------------------B
         B-----------------------------B
         B-----------------------------B
         B-----------------------------B
         BBBBBBBBBBBBBBBBBBBBBBBBBBBBBBB

         BBBBBBBBBBBBBBBBBBBBBBBBBBBBBBB
         B-----------------------------B
         B-----------------------------B
         BS----------------------------B
         B-----------------------------B
         B-----------------------------B
         B-----------------------------B
         B-----------------------------B
         B-----------------------------B
         B-----------------------------B
         B-----------------------------B
         B-----------------------------B
         BBBBBBBBBBBBBBBBBBBBBBBBBBBBBBB
although the yielded amount of cobblestone, dirt/sand, coal, iron, and to some extent gold, will be enormous, and the possibility of lava is very high, this is not the best method for mining diamond and lapis lazuli, because they're found only at the bottom of the map (Note: Diamonds and Lapis Lazuli CAN be mined using this method, but due to their rarity the placement of the quarry along with its size will determine the amount). This type of mining is suggested for getting large amounts of cobblestone, iron and coal, besides the ability to gain large amounts of resources, this type of mining exposes many caves for further exploration/mining.
Besides mining, Quarries also have some non-resource related benefits, such as keeping the area clean and fresh (not ruining the nature), and a handy trap as the mine is very deep.
Water blocks placed two high at the bottom of a quarry can allow quick descent (by just jumping into the water), and water elevators can be used to quickly return to ground level from the bottom.
Warning: Be extremely careful around this mine, as a fall will surely be fatal.
Box mining
Key: A=Air W=wall Box mining is a type of mining I created and always use. It consists of making a "box" 2x2 height and how ever long and wide you want it heres an example: Step1:
      WWW
      WAW
      WWW
Step2:
      WWWW
      WAAW
      WAAW
      WWWW
Step3:
      WWWWW
      WAAAW
      WAAAW
      WAAAW
      WWWWW
Notice that the bottom wall stays the same and the width and length extends by 1 each loop. This type of mining unearths more resources as you extend, so the larger the mine, the higher chance you have of finding an ore.
Cosmetic Mines
This section is for mines that are not cramped midget tunnels and focus more on aesthetics rather then efficiency.
Clc's Vertical design
A mine of mine (No pun intended) I decided to talk about, seeing as how few aesthetic mine designs there are it should be a welcome change. Mind you don't expect to do all the connections, let alone open/maze connections (Varations section) unless you're on a server, or you have a will you can break diamond on.
Design
This design consists of a Hub and a Push leading into another Hub.
Hub:
Top view:
         BBBBBBB

         BB___BB

         B_____B

         B_____B

         B_____B

         BB___BB

         BBBBBBB
Side view:
         BBBBBBB

         BB___BB

         BB___BB

         B_____B

         B_____B

         B_____B

         BBBBBBB
Where B a block and _ is air.
Each push is basically the design behind it (The side view) dropped a square repeated several times, the amount is dependent on the miner but an even number is prefered due to torch placement (Discussed later) The central hub (The first hub made in the mine) will have 4 pushes in each of the cardinal directions, eventually, if you are in need of ores you may choose to go down in one direction until you have what you need. I recommend you check your y coordinate about now, you may want a push length that will allow you to get your y value as close as you can to 12 (Lava spawns in caves at 10, and your y is up 2 for the positioning of your head) After you've decided on your length and finished a push you make another Hub in the same size as above. Continue until you reach the last of your hubs (You should end it before you hit bedrock, otherwise it won't be very nice looking)
Torch Placement
Torch placement is simple in this design. You will have 8 torches in each hub, on both sides of the bottom of the corners. If you want you may add a torch to the center floor to add more light, but it is enough to prevent mobs spawning as it is now.
For every push you put two torches on every other left and right hangs.
Connections
After you finished all of the cardinal pushes you'll be wondering what next to do, considering the amount you've mined you may want a place to store away items, connections are great for this.
Each connection is a hub formed by two of the cardinal branches intersecting, meaning if you went to the first north hub down, you'd have to mine one push/hub to the left and connect to it from the first west hub down by pushing right. It's the same as the hub but it leaves two walls with nothing to do, if you try to continue with them you will get intersections that are hard to make aesthetic unless your looking for a large open mine, or a maze mine. Instead, you can use it for chests, and it works well for it's purpose. Very hard to describe with letters, so here's a picture instead: Picture
Continuations
After your cardinal directions are done, you have your as many connections as you care for, what's next? You continue Adding onto your bottom hubs, only with straight pushes. The bottom hubs will branch in all directions except backwards (Unless your going with a open/mine variation) and each of those hubs may spread in the same direction so long as it's not backwards for the original hub. If you positioned well in the first centeral hub and push size, you'll be scraping a long in a fairly wide tunnel along the same height you find diamonds. It's easy sailing from here on.
Varations
Central Drop shaft:
Central hub is under an area of flat ground, you put a three deep hole where torches will go, ladders go on the bottom and top, torches in the middle, you go above the hub as normal only there will be a 2 high gap under the hangs on this first hub to allow for the ladders as a way up. Due to update you will need the ladders to go all the way down, and such won't have a place for a torch. You can circumvent this by putting them on the middle of part left over at the top of the next section, the lighting is the same and you won't need an extra torch to prevent mobs spawning. This also works particularly well if you want to replace the top with glass.
Open Mine Connections:
Same as original, only every connection you make splits off in all four directions. It goes up with a 1 wide path in the center in all four directions and the both of the two wide paths go down until they merge (Which is when it can do so without getting rid of the upward path
There are two variations, one where you will go up when you make a connection, so you will have a stack of hubs in all directions, another where you only dig down in the connections, where they intersect you build the 1 central path down to the hub. The latter is more efficient as all of it will eventually lead to the bottom and therefore be mining ore.
Maze Mine Connections:
The same as an Open Mine except your down path is one wide, not your up path. Same two variations, same correlation in efficiency.
Lava lights:
You can replace the torches in the center (If you placed them at all) of the hubs with a piece of glass and lava under it and it gives only one light less. You can change it for a 3x3 if you feel so inclined and have enough lava.
Drop Shafts:
This combines the Central Drop Shaft and optionally the Open and Maze Mine Connections. It requires close tallies if you don't want to combine them though.
At your Hub you mine down the same as if you were going to make a Centeral drop Shaft, but continue until you are on the same level as your next hub (Depends on the size of your push, like a 8 push would be 8 blocks down) After you reach the bottom you make another hub in the same style as a Centeral Drop Shaft. This will require more ladders, so it's not a very good idea if your short on wood, but it allows a certain maze quality that I find welcome.
There are two places where you can put the ladders, but the two per corner type of the Central Drop Shaft style is preferred, however the other style uses less ladders. You mine your shafts in the blocks directly north/south/east/west of the center so that you have 4 shafts all the way to the next hub, this require 5 blocks to hang down from the hub, some like it, others don't.
Two variations on top of that, you may use the drop shaft for all your hubs, thus any hub with a hub above will be able to ascend, or you can only use the shafts for the centeral hub, adding 'terraces' to your mine.
Where does open/maze mine connections come in? After you get down to the bottom level you may continue to stretch out and connect with the original push/hubs. Once you connect you may use the open style, leaving 1 wide path up or the maze, leaving 2x2 wide up.
Space/Portion Mining
Not to be confused with Strip Mining, however, this does involve a similar methed.
Room Mining
This form of mining involves someone to make a hall way and then make a small opening in the wall. From there, one must simply dig out a portion of the block to create a space. This method is repeated many times down the hall on either side to create rooms for various purposes, while finding several ores and valued materials in the process. This method is useful for the creation of houses, barns, indoor-gardens, storages, and in the creation of hard-to-find/secret places.
Tunnel Mining
This is highly similar to Room Mining, except that instead of Building rooms, you build tunnels. However, this takes much longer to do and tunnels are usually much larger than rooms. Because of this, Tunnel Mining is lesser to be used as the tunnels take up many tools in the process of making them. Despite the fact that they may yield many resources, players may use up several pick axes or shovels in the process of making them as well as torches to light up the tunnel. Players may get bored of doing this and may abandon the tunnels while still in the process of making them. Some may not consider beginning construction on future tunnels due to lost supplies and the tunnel not being rewarding enought to continue. This method is useful for making minecart subways, large indoor-gardens, art galleries, tree farms, boats rivers, large barn(s), mazes, doing construction on vertical and horizontal structures, constructing strip mines, and secret/hard-to-find areas by making tunnels that seem to go nowhere.
Clear Mining/Safe Mining
The general purpose of Clear Mining (or Safe Mining, whichever one may prefer to call it) is a variation of Box Mining and other simple techniques. A player first finds a suitable area, preferably one block above the bedrock layer so that the player can easily obtain diamonds and other rare minerals. The player must also have at least 5 to 6 stone picks, one steel pick for rare minerals such as gold, and 3-4 shovels for gravel. A sword is optional depending on the players preferred difficulty settings. Once the player has found a suitable and deep area that they are confident in they may either begin or set up a small chamber near the area to store minerals and construct tools to further their mining. To begin, make a simple 1 block long and 2 blocks high that spans roughly 8-10 blocks in length. Once this has begun, the player then uses their stone picks to mine directly in front of them where their tunnel ends, but, there is a catch. The player does not move once they make their initial 8-10 block tunnel, and mines only the above block of the two block height making a small box, 4 blocks long. Once the player makes a half tunnel 4 blocks long, the turn to their left or right and do the same; not breaking any of the blocks below the first block. (when done the concept is much more simple) After the player makes a reversed "T" shape, then the player can start to mine out the remaining areas around the tunnels, only using their reach length to clear away stone and any materials. Once the player has maxed out their reach length, they will be in small "box" that reduces risks of being suffocated by gravel or possibly lava. The player then should have a clear area, and then mines out the remaining second blocks, still avoiding the "edges" of the safety box. Once all materials are mined, the player can then break the box and gather the resources in one quick run. Once the player is done in this, there will of course be small "edges" that they not reach, and these should be mined out making a clear box. To further the effectiveness of this strategy, one may then place torches in the "frontal" corners of the area and repeat the process on each side, however this time, rotating their view to clear away all areas of their reach, so long as they are away from their initial entrance tunnel. The end result should be a very fast, resourceful, and safer approach to mining at bedrock. However, mobs may spawn in areas of the mine that are poorly lit, and lava is a factor, along with tediousness, so the player must make a commitment to a clear mine, leaving when satisfied with their bounty of materials. Like parenthesized above, this strategy is best played out rather than explained.
Tips
- If you find Dirt, Gravel, or Lava spots while mining, most likely you will find ore (depends how deep you are).
- As players tend to ignore gravel, it is possible that if one carries 2-4 shovels while mining and takes the time to dig out areas of gravel, it is more likely that a player can find ores hidden underneath pockets of gravel, or even caves.